
在 STAR CCM+中,除了可以利用录制的宏构建仿真流程外,还可以通过 Assistant 来实现流程简化及封装。STAR CCM+中的 Assistant 开发涉及到 Java 及 Xhtml,总体上来讲并不复杂。
下面以一个简单的案例来描述 Assistant 的开发过程。
注:下文内容大部分来自STAR CCM+ Tutorials,为方便理解,部分内容进行了修改。
”
1 案例描述
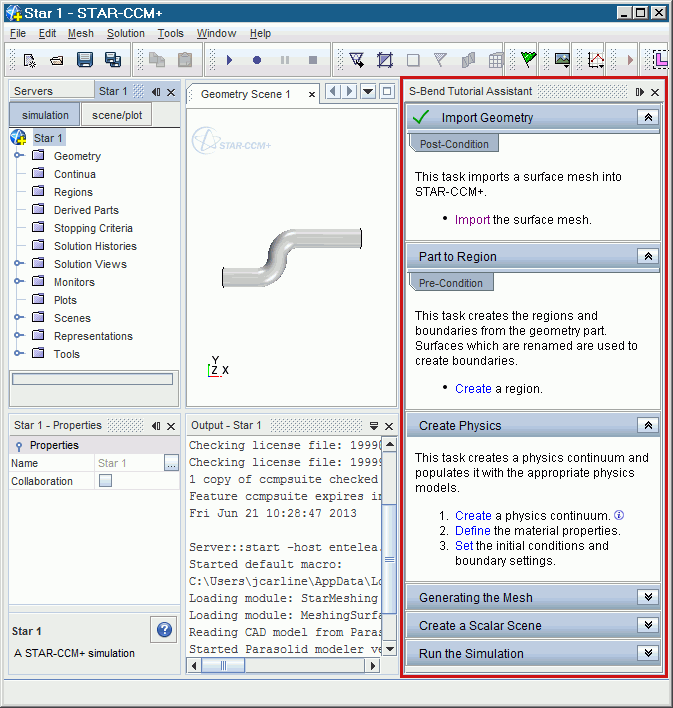
案例完成后的效果如下图所示。在STAR-CCM+中加载Assistant后,工作流会显示在用户界面的右侧,如以下屏幕截图中以红色突出显示的区域那样。Assistant项目由 Java 类和 XHTML 文本组成。
在开发Assistant时,建议使用IDE(集成开发环境)。本教程使用NetBeans 12.6 IDE或更高版本。
本教程介绍了为简单工作流创建仿真助手的步骤。创建的特定工作流用于对内部管道流进行建模。现有的S形弯头教程就是这样一个内部流程的示例。
创建Assistant时,将工作流分解为逻辑任务,并将相关操作分组在一起非常有用。例如,与创建和设置模拟物理相关的动作可以在单个任务中组合在一起。本教程中的Assistant包含有六项任务:
-
导入几何 -
从Parts创建Regions -
设置Physics -
生成网格 -
显示计算结果 -
执行计算
通常,有两种方法可以用于为每个任务创建初始Java代码:
-
在STAR-CCM+ GUI中进行示例模拟时记录Java宏。将录制的宏中的相关代码复制并粘贴到仿真Assistant项目中。 -
为辅助项目编写自己的代码。
在本教程中,将从创建一个具有基本功能的简单助手开始。基本助手完成后,将为其添加更高级的功能。这些功能包括:
-
Conditions:为助手增加了一层额外的控制和指导,并在任务之间移动时起到了保护作用 -
Information Tags:标签允许添加有关任务或特定步骤的更多信息,而不会弄乱辅助面板。默认情况下,附加信息是隐藏的,只有在需要时才会显示。 -
Object Tree Focus:允许操作STAR-CCM+对象树。单击步骤时,可以控制Simcenter STAR-CCM+对象树中的相应对象是否高亮显示。如果对象隐藏在管理器节点内,这些节点将自动展开。
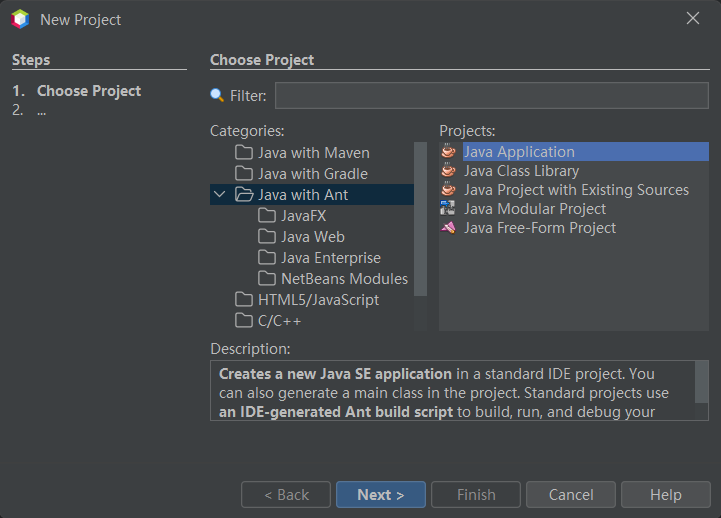
2 创建NetBeans项目
-
启动NetBeans
-
取消选项 Create Main Class

-
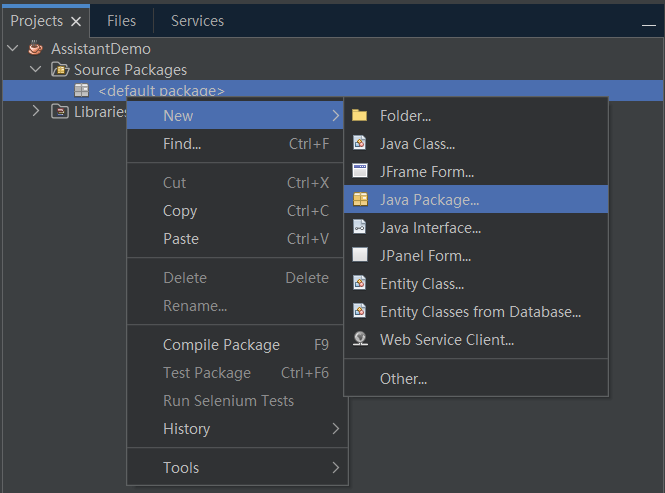
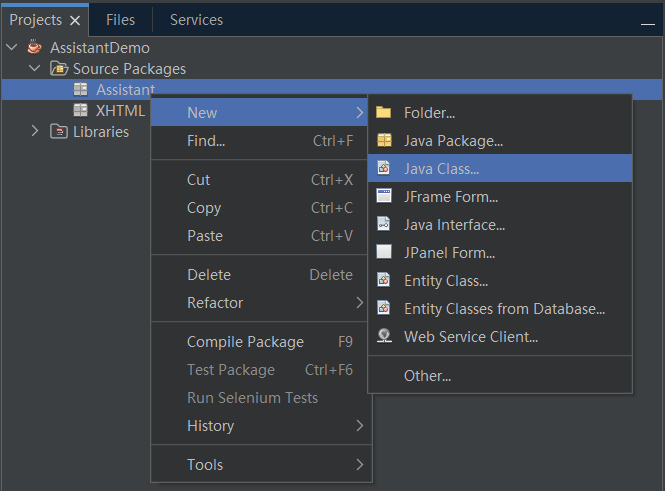
右键选择节点 default package,点击菜单New → Java Package...创建两个包:Assistant及XHTML
-
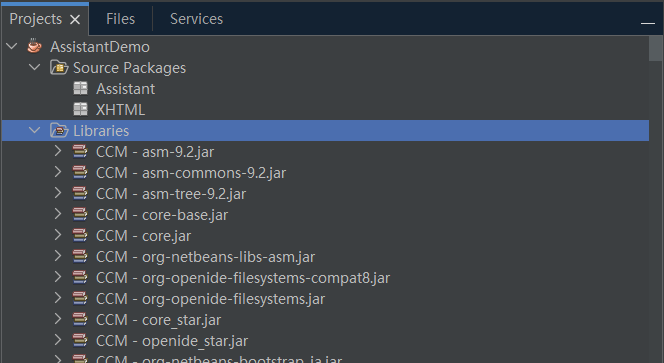
点击右键菜单 Add Library...,在弹出的对话框中增加STAR CCM+库
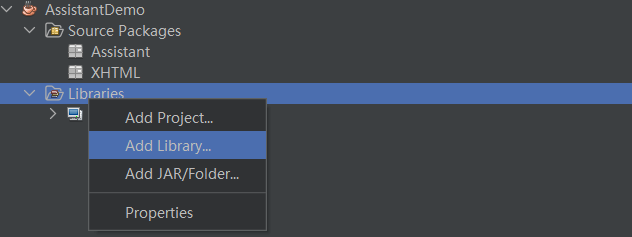
添加完毕后如下图所示。
3 创建Assistant类
助理类充当Assistant中所有任务的“目录”。首先创建这个类是很好的做法,因为其允许在完成任务后测试它们。最初创建类的“模板”,并在完成任务类时将它们的名称按您希望它们出现的顺序添加到此模板中。
-
添加JAVA Class…
-
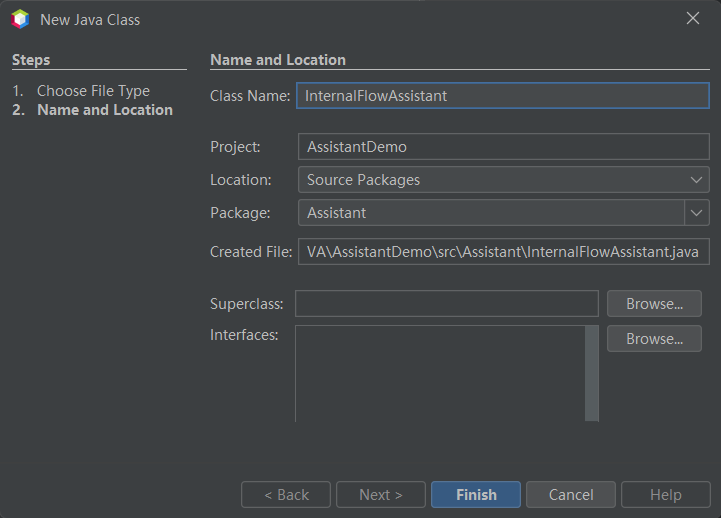
在对话框中设置类的名称为 InternalFlowAssistant
输入内容:
package Assistant;

import java.util.ArrayList;
import java.util.List;
import star.assistant.SimulationAssistant;
import star.assistant.Task;
import star.assistant.annotation.StarAssistant;

// Specifies the name of the Simulation Assistant in the GUI.
@StarAssistant(display = "Internal Flow Assistant")
public class InternalFlowAssistant extends SimulationAssistant {

    public InternalFlowAssistant() {
        // Creates a new array list for the list of tasks.
        List tasks = new ArrayList();
        // Contains the list of tasks.
        tasks.add(new Task1Name());
        setOutline(tasks);
    }
}
这里tasks.add(new Task1Name())用于向Assistant中添加页面,后面要修改。
4 创建第一个Task
4.1 新建类
-
在 Assistant包中添加一个新类,命名为Task01ImportGeometry

输入内容:
package Assistant;

import java.io.File;
import java.util.Collection;

import javax.swing.JFileChooser;

import star.assistant.Task;
import star.assistant.annotation.StarAssistantTask;
import star.assistant.ui.FunctionTaskController;
import star.base.neo.DoubleVector;
import star.common.GeometryPart;
import star.common.Simulation;
import star.common.SimulationPartManager;
import star.meshing.PartImportManager;
import star.vis.CurrentView;
import star.vis.PartDisplayer;
import star.vis.Scene;

@StarAssistantTask(display = "Import Geometry",
        contentPath = "XHTML/01_ImportGeometry.xhtml",
        controller = Task01ImportGeometry.ImportGeometryTaskController.class)

public class Task01ImportGeometry extends Task {

    public Task01ImportGeometry() {
    }

    public class ImportGeometryTaskController extends FunctionTaskController {

        public void importSurfaceMeshDialog() {

            //open a file chooser
            JFileChooser fileChooser = new JFileChooser();
            if (fileChooser.showOpenDialog(null) != JFileChooser.APPROVE_OPTION) {
                return;
            }
            File cadFile = fileChooser.getSelectedFile();

            //import the part
            Simulation simulation_0 = getSimulation();
            PartImportManager partImportManager_0
                    = simulation_0.get(PartImportManager.class);

            //use default import options
            partImportManager_0.importCadPart(cadFile.getPath(), "SharpEdges", 30.0, 2, true, 1.0E-5, true, false);

            //add the new part to the lookup
            Collection new_parts = simulation_0.get(SimulationPartManager.class).getParts();
            if (!new_parts.isEmpty()) {
                addToTaskLookup(new_parts.iterator().next());
            }
        }
    }
}
这里使用JFileChooser启动文件打开对话框,从而允许选择几何文件。文件导入的代码是通过GUI录制生成的。
4.2 添加任务描述
-
右键选择 XHTML,点击菜单New → Other...
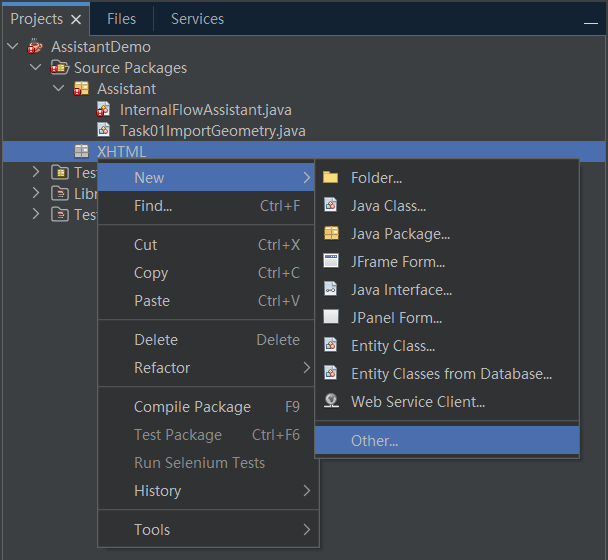
-
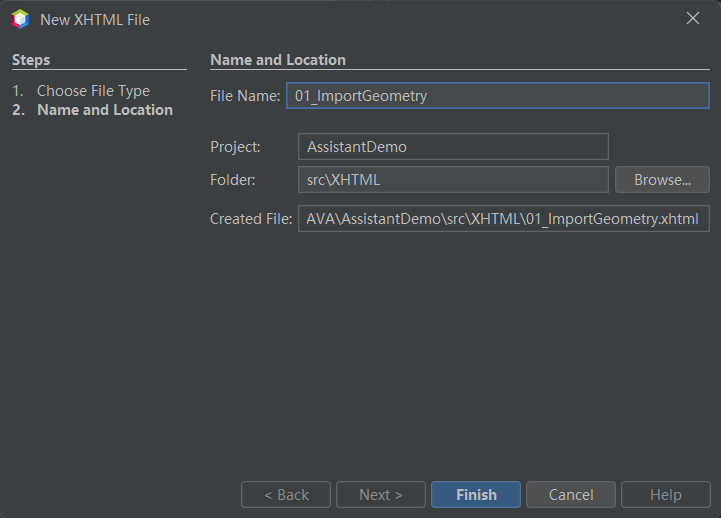
打开的对话框中选择 XHTML File
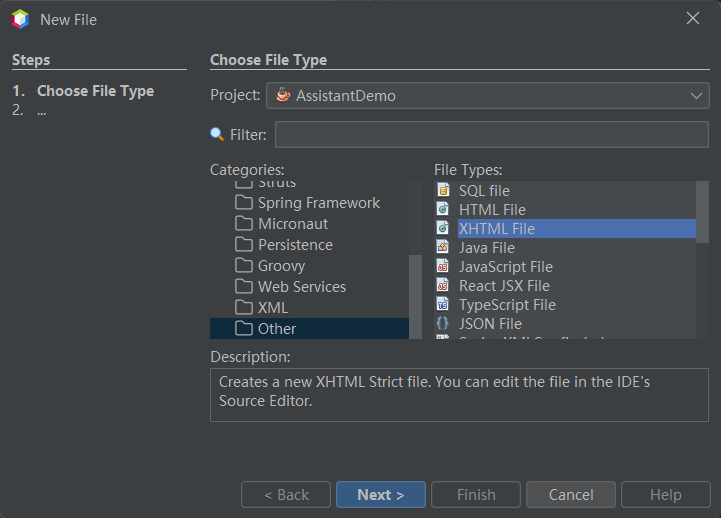
-
指定文件名为 01_ImportGeometry
输入以下内容:
html PUBLIC "-//W3C//DTD XHTML 1.1//EN" "http://www.w3.org/TR/xhtml11/DTD/xhtml11.dtd">
<html xmls="http://www.w3.org/1999/xhtml">
    <head>
        <meta http-equiv="CONTENT-TYPE" content="text/html; charset=utf-8" />
    head>
    <body>
        <p>

            This task imports a geometry part into STAR-CCM+.
            <ul>

                <li><a href="staraction:importSurfaceMeshDialog">Importa> the surface mesh.li>
            ul>
        p>
    body>
html>
4.3 将XHTML内容链接到Task类
-
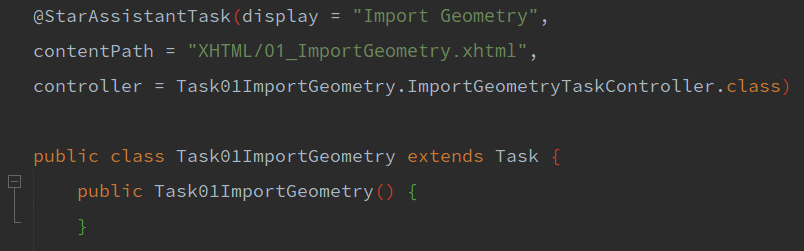
打开 Task01ImportGeometry文件,在public class Task01ImportGeometry extends Task {前面添加下面的内容
@StarAssistantTask(display = "Import Geometry",
    contentPath = "XHTML/01_ImportGeometry.xhtml",
    controller = Task01ImportGeometry.ImportGeometryTaskController.class)
添加完毕后如下图所示:
4.4 构建项目
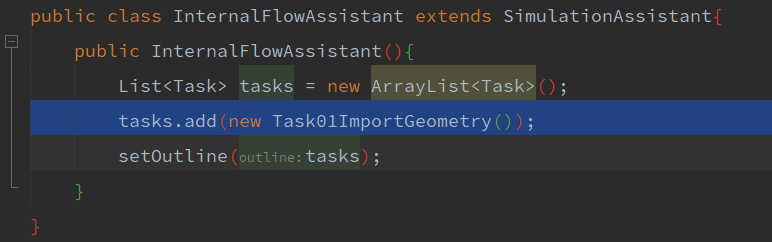
在构建项目之前,需要修改类InternalFlowAssistant的内容。
-
将代码 Tasks.add(new TaskName());修改为tasks.add(new Task01ImportGeometry());
修改完毕后如下图所示:
-
选择菜单 Run → Build Project或按键盘F11构建项目
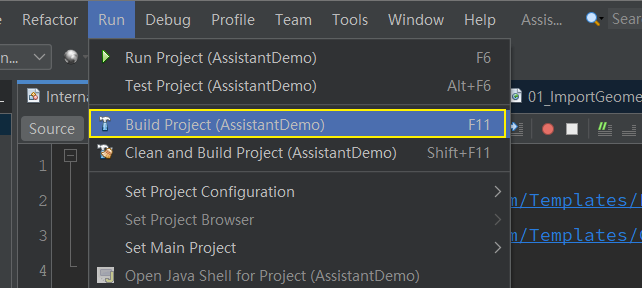
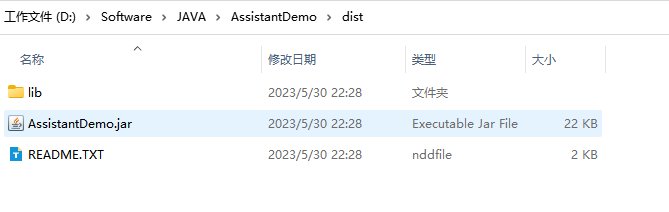
构建完毕后,在文件夹dist下生成一个名为InternalFlowAssistant.jar 的文件。
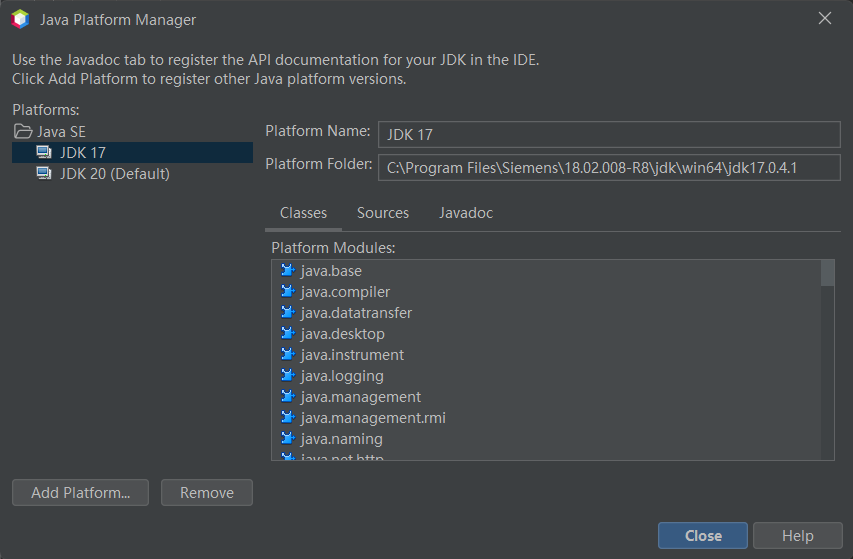
这里需要注意JDK版本,若编译Java的版本比STAR CCM+内置的版本高,运行的时候会出错。可以通过更改项目JDK来避免此问题。
-
选择使用 JDK 17
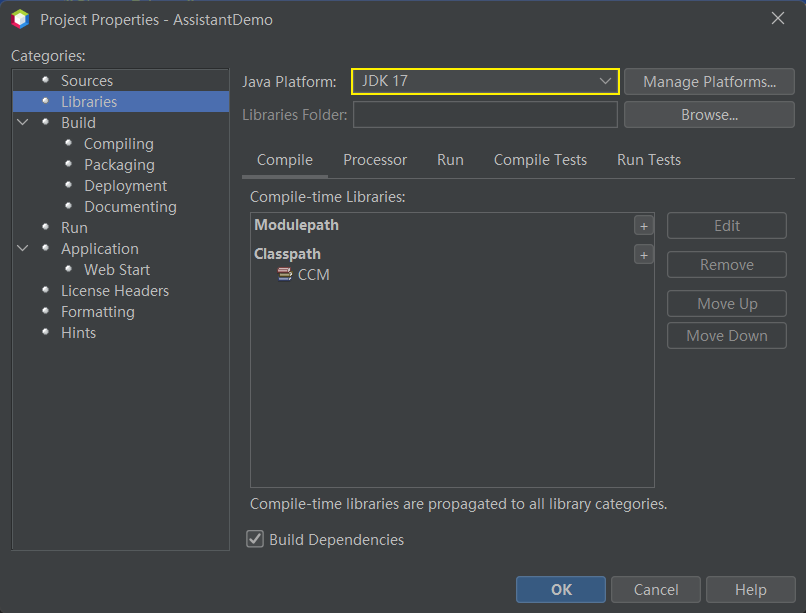
若下拉框中没有当前STAR CCM+对应的JDK版本,可以通过点击按钮Manage Platforms...打开如下图所示的对话框,添加STAR CCM+安装路径下的JDK,之后再重新构建JAR。
4.5 加载测试
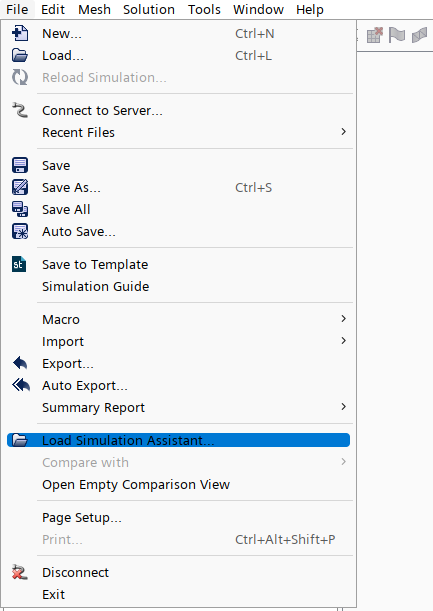
-
启动STAR CCM+并创建Simulation -
选择菜单 File → Load Simulation Assistant...,加载前面生成的jar文件
-
运行显示如下图所示
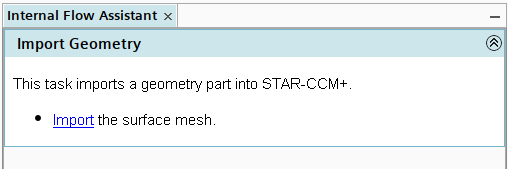
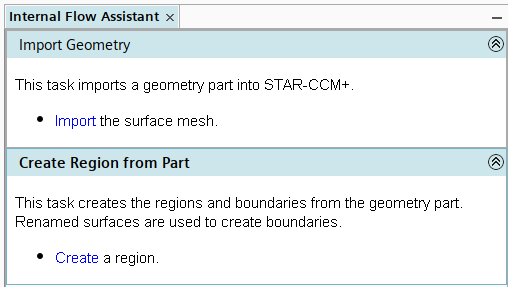
点击链接Import可激活文件选择对话框,选择几何文件即可导入模型。
5 创建第二个Task
与前面创建第一个Task流程相同,创建第二个Task。
5.1 新建类
在Assistant包中创建新类,命名为Task02CreateRegionFromPart,其代码为:
package Assistant;

import java.util.ArrayList;
import java.util.Collection;

import star.assistant.Task;
import star.assistant.annotation.StarAssistantTask;
import star.assistant.ui.FunctionTaskController;
import star.common.GeometryPart;
import star.meshing.CadPart;

@StarAssistantTask(display = "Create Region from Part",
    contentPath = "XHTML/02_CreateRegionFromPart.xhtml",
    controller = Task02CreateRegionFromPart.RegionFromPartTaskController.class)
public class Task02CreateRegionFromPart extends Task {

    public Task02CreateRegionFromPart() {
    }

    public class RegionFromPartTaskController extends FunctionTaskController {

        public void createRegion() {
            CadPart cadPart_1 = lookupObject(CadPart.class);
            if (cadPart_1 != null) {
                Collection list = new ArrayList();
                list.add(cadPart_1);
                getSimulation().getRegionManager().newRegionsFromParts(list,
                    "OneRegionPerPart", null, "OneBoundaryPerPartSurface", null,
                     true);
            }
        }
    }
}
此类的目的是将Part指定为Region,类中的内容为GUI录制。
注意代码中的xhtml文件链接。
5.2 添加文本描述
在XHTML包中添加XHTML文件02_CreateRegionFromPart,文件内容为:
html PUBLIC "-//W3C//DTD XHTML 1.1//EN" "http://www.w3.org/TR/xhtml11/DTD/xhtml11.dtd">
<html xmls="http://www.w3.org/1999/xhtml">
    <head>
        <meta http-equiv="CONTENT-TYPE" content="text/html; charset=utf-8" />
    head>
    <body>
        <p>
            This task creates the regions and boundaries from the geometry part. Renamed surfaces are used to create boundaries.
            <ul>
                <li><a href="staraction:createRegion">Createa> a region.li>
            ul>
        p>
    body>
html>
5.3 构建项目
-
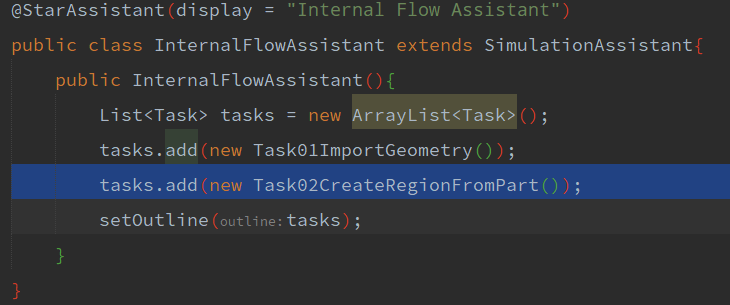
修改 InternalFlowAssistant,添加内容:
tasks.add(new Task02CreateRegionFromPart());
修改完毕后的代码如下图所示:
-
利用快捷键 Shift + F11重新构建项目
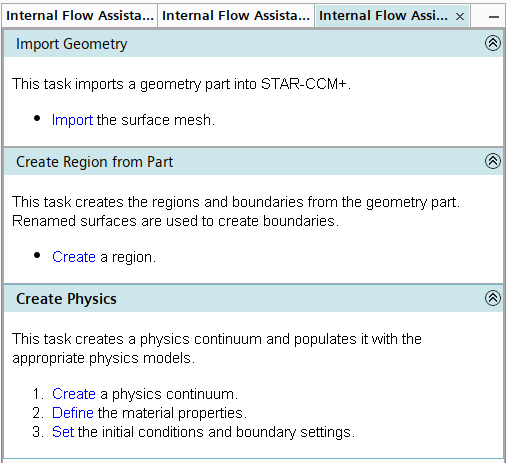
测试运行,如下图所示。
点击链接Create能自动将Part分配到Region。
6 创建第三个Task
第三个Task中主要完成模型选择、材料设置及初始参数设置。这些功能代码均通过录制得到。
6.1 创建类
创建新类Task03Physics,其代码为:
package Assistant;

import star.assistant.annotation.StarAssistantTask;
import star.assistant.Task;
import star.assistant.ui.FunctionTaskController;
import star.common.*;
import star.flow.*;
import star.material.*;
import star.metrics.ThreeDimensionalModel;
import star.segregatedflow.SegregatedFlowModel;

@StarAssistantTask(display = "Create Physics",
        contentPath = "XHTML/03_Physics.xhtml",
        controller = Task03Physics.PhysicsTaskController.class)

public class Task03Physics extends Task {

    public class PhysicsTaskController extends FunctionTaskController {
        public void createPhysicsContinuum() {
            // code for Step 1: creating and defining the physics continuum.
            Simulation simulation_0 = getActiveSimulation();
            PhysicsContinuum physicsContinuum_0 = simulation_0.getContinuumManager().createContinuum(PhysicsContinuum.class);
            physicsContinuum_0.setPresentationName("Physics");
            physicsContinuum_0.enable(ThreeDimensionalModel.class);
            physicsContinuum_0.enable(SteadyModel.class);
            physicsContinuum_0.enable(SingleComponentGasModel.class);
            physicsContinuum_0.enable(SegregatedFlowModel.class);
            physicsContinuum_0.enable(ConstantDensityModel.class);
            physicsContinuum_0.enable(LaminarModel.class);
        }

        public void materialProperties() {
            // code for Step 2: modifying the material properties of air.
            Simulation simulation_0 = getSimulation();
            PhysicsContinuum physicsContinuum_0 = ((PhysicsContinuum) simulation_0.getContinuumManager().getContinuum("Physics"));
            SingleComponentGasModel singleComponentGasModel_0 = physicsContinuum_0.getModelManager().getModel(SingleComponentGasModel.class);
            Gas gas_0 = (Gas) singleComponentGasModel_0.getMaterial();
            ConstantMaterialPropertyMethod constantMaterialPropertyMethod_0 = (ConstantMaterialPropertyMethod) gas_0.getMaterialProperties().getMaterialProperty(ConstantDensityProperty.class).getMethod();
            constantMaterialPropertyMethod_0.getQuantity().setValue(1.0);
            ConstantMaterialPropertyMethod constantMaterialPropertyMethod_1 = (ConstantMaterialPropertyMethod) gas_0.getMaterialProperties().getMaterialProperty(DynamicViscosityProperty.class).getMethod();
            constantMaterialPropertyMethod_1.getQuantity().setValue(1.716E-5);
            Units units_0 = ((Units) simulation_0.getUnitsManager().getObject("kg/m^3"));
            Units units_1 = ((Units) simulation_0.getUnitsManager().getObject("Pa-s"));
        }

        public void initialConditionsAndBoundarySettings() {
            // code for Step 3: defining the initial conditions, boundary type, and boundary conditions
            Simulation simulation_0 = getActiveSimulation();
            PhysicsContinuum physicsContinuum_0 = (PhysicsContinuum) simulation_0.getContinuumManager().getContinuum("Physics");
            VelocityProfile velocityProfile_0 = physicsContinuum_0.getInitialConditions().get(VelocityProfile.class);
            velocityProfile_0.getMethod(ConstantVectorProfileMethod.class).getQuantity().setComponents(0.429, 0.0, 0.0);
            Region region_0 = simulation_0.getRegionManager().getRegion("Fluid");
            Boundary boundary_0 = region_0.getBoundaryManager().getBoundary("Inlet");
            boundary_0.setBoundaryType(InletBoundary.class);
            VelocityMagnitudeProfile velocityMagnitudeProfile_0 = boundary_0.getValues().get(VelocityMagnitudeProfile.class);
            velocityMagnitudeProfile_0.getMethod(ConstantScalarProfileMethod.class).getQuantity().setValue(0.429);
            Boundary boundary_1 = region_0.getBoundaryManager().getBoundary("Outlet");
            boundary_1.setBoundaryType(PressureBoundary.class);
        }
    }
}
6.2 添加文本描述
添加文件03_Physics.xhtml,文件内容为:
html PUBLIC "-//W3C//DTD XHTML 1.1//EN" "http://www.w3.org/TR/xhtml11/DTD/xhtml11.dtd">
<html xmls="http://www.w3.org/1999/xhtml">
    <head>
        <meta http-equiv="CONTENT-TYPE" content="text/html; charset=utf-8" />
    head>
    <body>
        <p>

            This task creates a physics continuum and populates it
            with the appropriate physics models.
            <ol>

                <li><a href="staraction:createPhysicsContinuum">Createa> a physics continuum.li>

                <li><a href="staraction:materialProperties">Definea> the material properties.li>

                <li><a href="staraction:initialConditionsAndBoundarySettings">Seta>
                    the initial conditions and boundary settings.li>
            ol>
        p>
    body>
html>
6.3 构建项目并测试
-
修改 InternalFlowAssistant文件并添加代码:
tasks.add(new Task03Physics());
-
利用快捷键 Shift + F11重新构建项目
加载后如下图所示。
其他的Task可以采用相同方式进行添加,这里就不赘述了。
7 添加条件
7.1 添加类
创建类InternalFlowConditions,其内容为:
package Assistant;
import java.util.Collections;
import star.assistant.CSOCondition;
import star.assistant.CSOLookupConditionTrigger;
import star.common.GeometryPart;
import star.common.filters.Predicate;
/**
* This class contains all conditions used in the Internal Flow Assistant.
*/
public class InternalFlowConditions {
public static synchronized CSOCondition
createPartCondition()
// Creates a new condition
CSOCondition partCondition = new CSOCondition();
// Sets the text description of the condition
partCondition.setDesc("A geometry part must be present.");
// Creates a new condition trigger that goes off when a cadpart is added to the lookup
CSOLookupConditionTrigger partConditionTrigger = new CSOLookupConditionTrigger(GeometryPart.class);
// Sets the list of triggers to the one created above.
partCondition.setTriggers(Collections.singleton(partConditionTrigger));
// Creates a new predicate (true/false evaluation) with an evaluate method and evaluates whether an object satisfies the condition.
partCondition.setPredicate(new Predicate() {
@Override
public boolean evaluate(GeometryPart part) {
// You could check for specific attributes of the part here.
return true;
}
});
return partCondition;
}
}
7.2 添加后置条件
-
返回到 Task01ImportGeometry 类。 -
找到 public Task01ImportGeometry() 构造函数。 -
将下列代码添加到该构造函数中:
// Makes sure that a geometry part is created.
setPostconditions(Collections.singleton(InternalFlowConditions.createPartCondition()));
其中:
-
setPostconditions() 设置任务的后置条件。 -
Collections.singleton(InternalFlowConditions.createPartCondition()) 是检查几何零部件的条件。
7.3 添加前置条件
如果模拟中没有零部件,您无法根据零部件创建域,所以向任务 2 中添加前置条件是非常有意义的,这样可在不存在几何零部件的情况下禁用该任务。
下列代码将前置条件添加到任务 2 中,以检查几何 > 零部件管理器节点是否存在零部件。如果不存在零部件,则禁用该任务。(以灰色显示)如果存在零部件,则满足条件并启用任务。前置条件仅影响其置入的任务。
-
返回到 Task02CreateRegionFromPart 类。 -
确定 public Task02CreateRegionFromPart() 构造函数的位置。 -
将下列代码添加到该构造函数中。
// 确保启用该任务之前几何存在。
setPreconditions(Collections.singleton(InternalFlowConditions.createPartCondition()));
其中:
-
setPreconditions() 设置任务的前置条件。 -
Collections.singleton(InternalFlowConditions.createPartCondition()) 是检查几何零部件的条件。
测试运行,结果如下图所示。
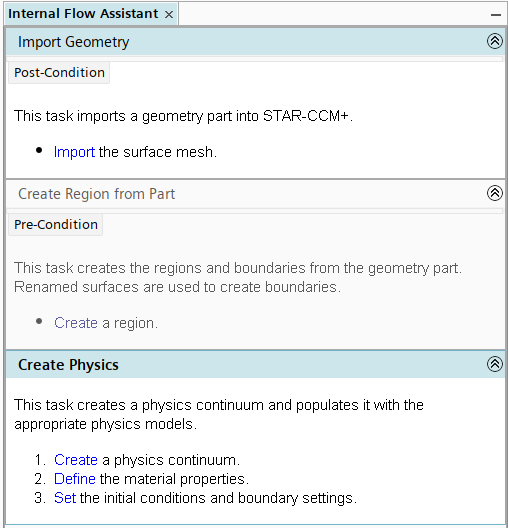
可以看到,若Task01中的几何没有导入,则Task02无法使用。
8 添加信息标记
可以在面板描述或步骤中添加标记信息,以对本步操作进行解释。
信息标记可获取更多关于特定步骤或任务的信息,但并不是完成任务的必需项。默认情况下,已最小化信息标记,并可在需要时将其展开。额外信息置于 XHTML 文件中的信息元素内:
Additional information goes here.
如修改 Task 3 的信息:
打开文件 03_Physics.xhtml,修改第一个列表的内容:
<ol>

    <li><a href="staraction:createPhysicsContinuum">Createa> a physics continuum.

        <information>The following physics models are suitable for this case:
            <ul>
                <li>Three Dimensionalli>
                <li>Gradientsli>
                <li>Steadyli>
                <li>Gasli>
                <li>Segregated Flowli>
                <li>Constant Densityli>
                <li>Laminarli>
            ul>
        information>li>
重新构建并加载运行。
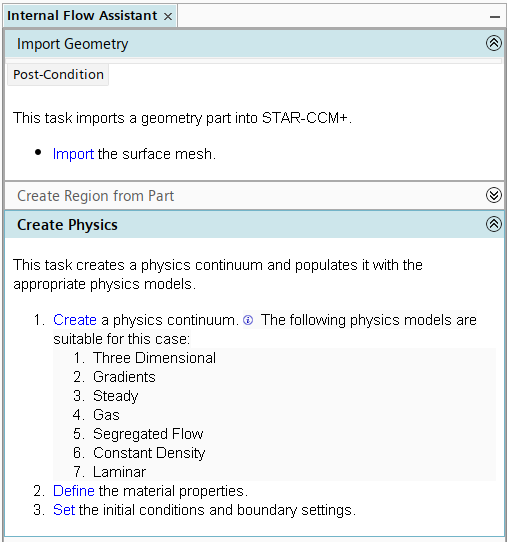
运行结果如下图所示,多了个感叹号。

点开后如下图所示。
完整的 03_Physics.xhtml 文件如下所示。
html PUBLIC "-//W3C//DTD XHTML 1.1//EN" "http://www.w3.org/TR/xhtml11/DTD/xhtml11.dtd">
<html xmls="http://www.w3.org/1999/xhtml">
    <head>
        <meta http-equiv="CONTENT-TYPE" content="text/html; charset=utf-8" />
    head>
    <body>
        <p>

            This task creates a physics continuum and populates it
            with the appropriate physics models.
            <ol>


                <li><a href="staraction:createPhysicsContinuum">Createa> a physics continuum.

                    <information>The following physics models are suitable for this case:
                        <ul>
                            <li>Three Dimensionalli>
                            <li>Gradientsli>
                            <li>Steadyli>
                            <li>Gasli>
                            <li>Segregated Flowli>
                            <li>Constant Densityli>
                            <li>Laminarli>
                        ul>
                    information>li>

                <li><a href="staraction:materialProperties">Definea> the material properties.li>

                <li><a href="staraction:initialConditionsAndBoundarySettings">Seta>
                    the initial conditions and boundary settings.li>
            ol>
        p>
    body>
html>
(完)

本篇文章来源于微信公众号: CFD之道


评论前必须登录!
注册